Color correction is a crucial aspect of portrait photography post-processing that involves adjusting and enhancing the colors in an image to achieve a desired look and feel. Accurate color correction service can elevate a portrait from good to exceptional, while improper adjustments can lead to unnatural and unflattering results. In this blog, we will explore essential tips for effective color correction in portrait photography, ensuring that the final images portray the subject in the best light.
Start with a Good Raw File:
The foundation of successful color correction lies in a high-quality raw file. Ensure that your camera settings, lighting, and exposure are well-managed during the photoshoot to capture accurate colors and details. A well-exposed raw file provides more flexibility for color adjustments during post-processing.
Use a Reliable Color Calibration Tool:
To achieve consistent and accurate colors, use a reliable color calibration tool for your monitor. Calibrating your monitor ensures that the colors you see on the screen are true to the actual image, reducing the chances of over or under-correcting colors.
Understand White Balance:
White balance is essential for achieving accurate colors in your portrait. Whether you use automatic white balance during the shoot or set it manually, understanding white balance and how it affects the color temperature of your images is crucial for effective color correction.
Work with Raw Editing Software:
Raw editing software like Adobe Lightroom and Capture One provides powerful tools for color correction. Use the white balance, temperature, and tint sliders to adjust the overall color balance in your portrait. Additionally, explore the HSL (Hue, Saturation, and Luminance) panel to fine-tune individual colors.
Use Targeted Adjustment Tools:
In addition to global adjustments, use targeted adjustment tools like the adjustment brush or radial filter to make specific color corrections. These tools allow you to selectively enhance or reduce colors in specific areas of the portrait, ensuring precise adjustments without affecting the entire image.
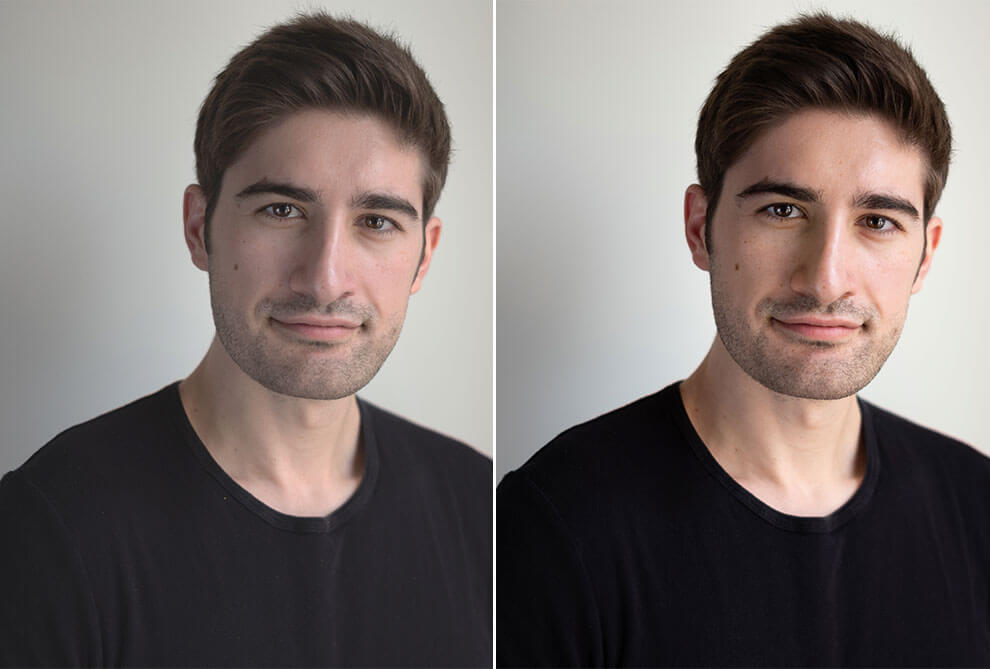
Pay Attention to Skin Tones:
Achieving natural-looking skin tones is crucial in portrait photography. Avoid oversaturating or overcorrecting skin tones, as this can lead to unnatural results. Use the HSL panel or the targeted adjustment tools to subtly adjust skin tones while preserving their authenticity.
Create a Consistent Color Palette:
For a cohesive look in a series of portraits, aim for a consistent color palette. This involves keeping similar color tones and hues across the images, creating a harmonious and visually appealing collection of portraits.
Use Color Grading for Artistic Effects:
Color grading can be employed to add creative and artistic effects to your portraits. Experiment with split toning, gradient maps, or color lookup tables to achieve a unique and stylized look while maintaining the overall harmony of colors.
Conclusion:
Effective color correction is a skill that can significantly impact the overall quality and impact of portrait photography. By following these tips and using the right tools and techniques, you can achieve accurate and visually stunning colors in your portraits. Whether you’re using color correction service, clipping path in Photoshop, or Photo Retouching Company, understanding the intricacies of color correction will help you produce captivating portraits that beautifully capture the essence of your subjects.