Key Takeaways
- You get about 20 to 30 minutes of good light after sunset. Once the sky goes fully dark, it’s gone, so plan ahead and be ready to shoot the moment the color arrives.
- Twilight shots need slow shutter speeds, sometimes several seconds. Even a slight hand movement blurs the photo, so use a tripod and a timer or remote.
- Turn on every light. That means lamps, overhead lights, porch lights, and landscape lighting. A fully lit home feels cozy, but one dark window makes the photo look unfinished.
- A soft, deep blue sky looks believable. An over-edited purple or orange one makes buyers doubt the photo, so aim for what you’d really see standing on the front lawn.
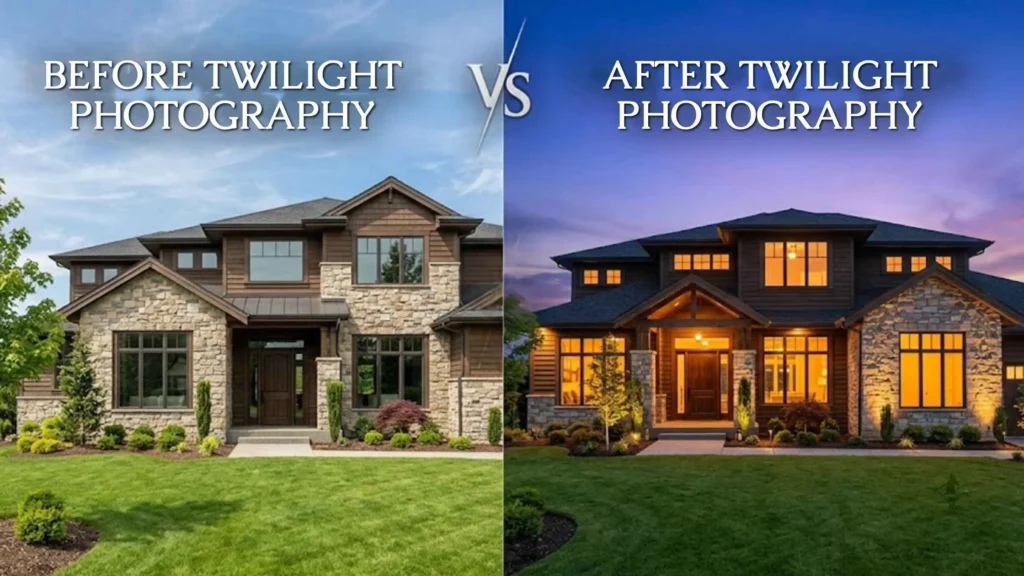
Twilight real estate photography means shooting a home just after sunset, when the sky is blue and the lit windows glow gold. That contrast makes a listing feel warm and inviting, and it stands out next to flat daytime shots. Here’s how to time it, gear up, shoot it, and when to fake it instead.
The catch is the clock. You get a short window of good light, so a little prep matters more than any fancy gear.
What Makes Twilight Real Estate Photos So Effective?
Real estate pictures are all alike: They are bright, flat, and a little sterile. However, there are two key differences that make twilight real estate photos special.
Color contrast. The photograph features warm, golden light emanating from the windows in contrast with a deep blue sky. Colors that complement each other attract viewers’ attention, and the result seems natural and professional.
Mood of the photograph. The illumination gives a sense that the house is inhabited and that it is the end of the day. Thus, a client sees not only the house but imagines himself entering the warm house after coming home by car.
This explains the popularity of real estate twilight photographs among clients, and they’re perfect for hero shots. From the photographer’s point of view, it is a unique service compared to a regular one.
When To Shoot: Timing the Golden/Blue Hour
The best light comes in the short stretch just after the sun drops below the horizon. Photographers call it the blue hour, meaning the sky is still bright enough to show color but dark enough for the house lights to pop. The sweet spot is about 15 to 30 minutes after sunset. Miss it early, and the sky is too bright, so the windows look dull. Miss it late, and the sky goes black, so you lose that lovely gradient.
Two habits will save you:
Scout in daylight. Walk the property before the shoot and pick your angles. Check where the streetlights and neighbors’ lights fall.
Arrive early. Aim to be set up 30 minutes before sunset, with the tripod planted and the lights already on.
Gear and Camera Settings
You don’t need a huge kit. For twilight real estate photography, you just need a few things.
Basic equipment:
- A solid tripod
- A wide-angle lens (so you can fit the whole front of the house in)
- A remote shutter or the camera’s timer (so that hitting the button doesn’t shake the shot)
- A camera that can be manually adjusted
Camera settings
| Setting |
Try This |
Why it helps |
|---|---|---|
| ISO |
100-200 px |
Keep the photo clean with little grain |
|
Aperture |
f/8-f/11 |
Keep the whole house sharp |
| Shutter Speed |
1-30 seconds |
Soaks up the fading light |
| Bracketing |
3-5 shots |
Gives you bright and dark versions to blend later |
Bracketing is taking the same photo at different brightness levels and then blending the best parts together in editing.
Before you shoot a real estate twilight photo, turn on all interior and exterior lights. Open the blinds so the glow is spread evenly. One dark window can give the whole picture an unfinished look.
Step-by-Step Twilight Shoot
Here’s a simple flow that you can do on every job.
- Set up during the daytime: position your tripod and set your frame when you can still see properly. Make sure your camera is level and all vertical lines are straight.
- Light up the house by turning on all lights and walking around to check for any dark spots or burned-out lights.
- Make your first test exposure as the sky starts to change and review your settings on the screen.
- Take your ambient shots. Take a few exposures as the sky becomes darker, giving you a chance to choose the sky color that works best for you.
- Take your lit shots. Get exposures with correctly exposed windows.
Real Vs. Virtual Twilight
In some situations, there might be problems in real estate twilight photography: the climate, timing, and money. “Virtual twilight” comes in handy in such situations. Virtual twilight means pictures are taken in the day but have been modified to resemble twilight.
|
Real Twilight |
Virtual twilight | |
|---|---|---|
| Look |
Real Glow |
Nice when executed well, but tends to look unnatural |
|
Effort |
1080 x 1350 px |
Daytime image edited |
| Cost |
Usually higher |
Usually lower |
| Best for |
Luxury and hero listings |
Link previewsQuick turnarounds and bad weather days> |
Ready to Make Your Listings Stand Out?
High-quality pictures in real estate can be a deciding factor in whether a listing is ignored or seen as worth visiting. This is where Plexail can help: our real estate photo editing services cover color correction, sky replacement, and object removal so your twilight shots look polished.
Contact us today and see what we can do for your next listing!